Sponging
is a favorite topic of mine, so it's a nice challenge for this week's Artsy Wednesday!
I use sponging a lot, and for all sorts of things, mostly to create a background for some nail art like in yesterdays post. It’s a pity that many only use it for gradients, because sponging really is a useful tool!
I use sponging a lot, and for all sorts of things, mostly to create a background for some nail art like in yesterdays post. It’s a pity that many only use it for gradients, because sponging really is a useful tool!
I use a
makeup vedge/sponge, very fine pored, and I often only use a corner. When I’m
finished I either rip it of when dry, or clip it, creating lots of new corners
to work with – so one single sponge lasts forever and forever…
The
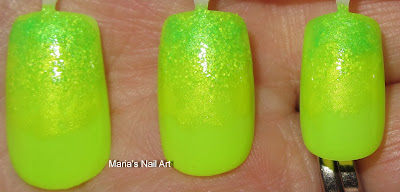
first I’ll show you is a classic sponged gradient, I used neons. The base color is
Sation Loudest Color, then I sponged the middle area with China Glaze
Sun-kissed, then closer towards the tip I used Pirate Polish Radioactive and
for the very tip I used a mix of Radioactive and China Glaze I’m With The
Lifeguard to make it more lime. Top coat is Seche vite.
01. I
created a mossy ground with Butter London Wallis over Essence Exits on your
right, and then I painted my flowers.
02. Over
Essence Via Airmail I sponged a diagonal belt of lighter blue with Barry M Cyan
Blue and I sponged a border on each side of that with Sinful Hottie (glitter) before I
painted my flowers.
03. On
Essence Destination Sunshine I sponged a mess of other colors – and it looked
terrible, I was like ARRRGHHH, but then I took my black striper, and it turned
out to be quite OK.
04. On
Essence Sending You Kisses I sponged a middle area with Barry M Neon Pink, it’s
difficult to see because of the boring flowers I painted, but it was a quite
subtle effect…
05. On China
Glaze frostbite I sponged one half with Sinful Hottie creating a diagonal line,
that I marked with a silver glitter striper.
Check out what the other girls in Artsy Wednesday did in this weeks challenge:
Michelle - Lab Muffin, Alanna - Pretty Purple Polish, Tif - Polished Genious, Lyndsey - Nails by Ms. Lizard, Melanie - Nail & Polish, Jessica - Beauty Gnome, Emily - An Accent Nail,
Check out what the other girls in Artsy Wednesday did in this weeks challenge:
Michelle - Lab Muffin, Alanna - Pretty Purple Polish, Tif - Polished Genious, Lyndsey - Nails by Ms. Lizard, Melanie - Nail & Polish, Jessica - Beauty Gnome, Emily - An Accent Nail,


