Check out my freehand nail art in the folders/pages above this line :) - Se min frihånds nail art i fanebladene over denne linie :)


Viser opslag med etiketten sponging. Vis alle opslag

fredag den 24. august 2012

Flowers in the mint candy


The base color is Jordana Mint Candy and the tips are sponged with Butter London Wallis. The flowers I as usual painted with acrylic colors and I top coated with Seche Vite.
I really liked this one a lot!
Grundfarven er Jordana Mint Candy, og jeg duppee tipperne med Butter London Wallis. Blomsterne er som sædvanligt malet med akrylfarve og toplakken er Seche Vite.
Jeg var godt tilfreds med resultatet!

onsdag den 15. august 2012

Sponging as effect & gradients - Artsy Wednesday

Sponging is a favorite topic of mine, so it's a nice challenge for this week's Artsy Wednesday!  
I use sponging a lot, and for all sorts of things, mostly to create a background for some nail art like in yesterdays post. It’s a pity that many only use it for gradients, because sponging really is a useful tool!
I use a makeup vedge/sponge, very fine pored, and I often only use a corner. When I’m finished I either rip it of when dry, or clip it, creating lots of new corners to work with – so one single sponge lasts forever and forever…
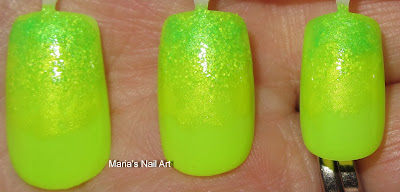
The first I’ll show you is a classic sponged gradient, I used neons. The base color is Sation Loudest Color, then I sponged the middle area with China Glaze Sun-kissed, then closer towards the tip I used Pirate Polish Radioactive and for the very tip I used a mix of Radioactive and China Glaze I’m With The Lifeguard to make it more lime. Top coat is Seche vite.

Here you have examples of background and effect sponging left to right, 01-05 - all top coated with Seche Vite - click on the photos if you want to see them in a larger size.
01. I created a mossy ground with Butter London Wallis over Essence Exits on your right, and then I painted my flowers.
02. Over Essence Via Airmail I sponged a diagonal belt of lighter blue with Barry M Cyan Blue and I sponged a border on each side of that with Sinful Hottie (glitter) before I painted my flowers.
03. On Essence Destination Sunshine I sponged a mess of other colors – and it looked terrible, I was like ARRRGHHH, but then I took my black striper, and it turned out to be quite OK.
04. On Essence Sending You Kisses I sponged a middle area with Barry M Neon Pink, it’s difficult to see because of the boring flowers I painted, but it was a quite subtle effect…
05. On China Glaze frostbite I sponged one half with Sinful Hottie creating a diagonal line, that I marked with a silver glitter striper.
Check out what the other girls in Artsy Wednesday did in this weeks challenge
Michelle - Lab Muffin,  Alanna - Pretty Purple Polish, Tif - Polished Genious, Lyndsey - Nails by Ms. Lizard, Melanie - Nail & Polish, Jessica - Beauty Gnome,  Emily - An Accent Nail 
NOT his week: Kamen - Kaka Beauty Blog, Catrine - Unnakednails,

lørdag den 2. juni 2012

Soul Sista united sponging - Soul Sista Week

I really don't like this mani, but here it is anyhow...
Jeg bryder mig faktisk ikke om denne mani, men her er den alligevel...
 
The base color is Essence 04 Totally Retro Nude, and it turned out to be a one-coater, nice surprise for a nude color. Color-wise definitely out of my comfort zone, and I would never wear it (or any skin toned nude) without nail art. It did not really inspire me to doing anything, but then I got the “bright” idea to sponge all the other colors from the Essence Soul Sista collection, see more HERE 
I was pleased when I wore it, felt it has kind of a water color-like look – but I now when I see the photos again, I don’t know how I feel about it, ahh well...
It’s difficult to get a clear picture of what Totally Retro Nude looks like on the nail, but it does peek through here and there LOL
Grundfarven er Essence 04 Totally Retro Nude, og selvom den er en nude, viste den sig at være en et-lags-lak. Farven er slet ikke mig, og jeg ville ikke bruge den (eller andre hudtone nudes) uden nail art. Den inspirerede mig ikke egang rigtigt til noget, men så fik jeg den ”lyse” ide at duppe de andre farver fra Essence Soul Sista kollektionen, se mere HER på med en make-up svamp. 
Jeg endte med at være tilfreds med det let vandfarveagtige look, men når jeg nu genser billederne nogen tid senere, ved jeg nu ikke rigtigt, men tjah...
Det er svært at se, hvordan Totally Retro Nude ser ud i sig selv, men den kigger igennem de andre farver her og der :)

torsdag den 24. maj 2012

Messy Mesmerize abstract mani


The base color is one coat of the very well pigmented, beautiful blue Essie Mesmerize, and then I chose 3 colors to sponge and dot on it: Essie Mint Candy Apple, Essie Cocktail Bling and OPI Alpine Snow. It’s totally unpredictable and not at all planned – and it was fun and bright to wear – do you like it as abstract nail art – or is it just a total mess to you – be honest??
Grundfarven er et lag af den meget velpigmenterede og smukke Essie Mezmerize, og derefter valgte jeg 3 farver som jeg duppede på: Essie Mint Candy Apple, Essie Cocktail Bling og OPI Alpine Snow. Det er helt uforudsigeligt og uplanlagt – og det var sjovt at have denne mani på med dens klare farver. Kan du li’ den som abstrakt nail art – eller synes du bare det er en gang rod – vær ærlig??

onsdag den 2. maj 2012

Greyscale galaxy – Artsy Wednesday

 
Dansk, se længere nede.
I have wanted to do a galaxy for a long time, but there are so many of them on various blogs, so did the world really need one more? No, I thought, but then this week’s challenge was “Greyscale”, and I immediately thought, yes, you should make a grayscale galaxy, I haven’t seen one of those around.
The base color is A-England Camelot. When dry I sponged random areas with OPI Alpine Snow, China Glaze Concrete Catwalk and Essie Cocktail Bling. The stars I dotted with Alpine snow, and finally I top coated this super easy & quick mani with Seche Vite.
Check out what the other girls in Artsy Wednesday did in this weeks challenge
Michelle at Lab Muffin,  Alanna at Pretty Purple Polish, Holly at Hooked, Tif at Polished Genious, Lyndsey at Nails by Ms. Lizard, Sofie from Swååfie, Catrine from Unnakednails, Melanie at Nail & Polish, Jessica at Beauty Gnome
Jeg har længe villet lave en galakse mani, men dem er der mange af på blogge rundt om i verden, så jeg syntes ikke der var brug for flere. Men da jeg fik titlen for denne uges udfordring ”gråtone skalaen” tænkte jeg straks, YES, jeg laver da en gråtone galakse, en sådan har jeg ikke set endnu. 
Til grundfarven brugte jeg A-England Camelot. Derefter duppede jeg med Essie Cocktail Bling, China Glaze Concrete Catwalk og OPI Alpine Snow, som jeg også prikkede stjernerne på med. Top coat er Seche Vite, og det er en super, super let og hurtig mani at lave.

torsdag den 19. april 2012

Spring abstract on Trout Pout

I simply felt like going crazy with a sponge and a dotting tool, and as I have been walking around Butter London Trout Pout considering some nail art on it – I decided to use it. With a makeup sponge I dabbed random areas with Essie Dive Bar (the very dark blue), Butter London Slapper (teal) and China Glaze Sunshine Pop (yellow) and I dotted random dots Nubar Blue Hydrangea (light blue) and some of the other colors too. Finally I top coated.
It’s an super easy and quick mani, and you can choose the colors you like.
Jeg havde lyst til at gå amok med en makeup svamp og et dotting tool, og da jeg havde gået og kigget på Butter London Trout Pout og overvejet hvilken nail art jeg skulle lave på den, blev det den. Med en makeup svamp duppede jeg tilfædige områder med Essie Dive Bar (den meget mørke blå), Butter London Slapper (teal) og China Glaze Sunshine Pop (gul) og jeg prikkede tilfædige prikker med Nubar Blue Hydrangea (lys blå) og lidt med andre farver også. Til slut lagde jeg toplak.
Det er en superlet og hurtig mani, og du kan vælge de farver du nu har lyst til.

tirsdag den 3. april 2012

Break of dawn

It’s probably difficult to tell what this is, without reading the description?
Ja, det er nok svært umiddelbart at se, hvad det skal forestille uden at læse teksten?
 
 
Tuesday the 27th of March, a week ago today,  the sky looked like this from the bedroom window. The sun was just surfacing, actually not as much as here, and the sky was neither grey nor pale blue yet, it was kind of like China Glaze Sea Spray, that I used for the base – not quite, but close enough. The base of the clouds caught the light of the rising sun, and because they were so dark grey the sun reflected red-ish and made them look stunningly gradient red mixed with dark grey. Of course it was much more beautiful IRL, I should have taken a photo, but when I realized that, it was too late…
I used several colors and sponged them on, some I mixed, and I forgot to make a note of which I used.
Tirsdag den 27. marts, for en uge siden i dag, så himlen sådan ud, da jeg lidt i syv trak gardinet til side i soveværelset. Solen var lige ved at bryde fri i horisonten, faktisk ikke så meget som solen på neglene, og himlen var hverken grå eller bleg blå, den mindede om China Glaze Sea Spray, som jeg brugte til bundfarve – ikke helt, men næsten. Skyernes underside blev oplyst af solen, og fordi de varierede i farve mellem meget mørk grå til hvid, reflekterede solens stråler rødligt og gav dem en helt fantastisk rødlig gradueret farve blandet med helt mørkegrå. Det var naturligvis meget smukkere i virkeligheden, men da jeg kom i tanke om at tage et billede var det for sent…
Jeg brugte flere forskellige farver (som jeg glemte at notere), nogle blandede jeg selv, og jeg duppede dem på med et lille stykke makeup svamp.

lørdag den 22. oktober 2011

Tiger nails - tiger negle!


11.09.28. I was inspired by "Tiger Nails" by "Cutepolish" on Youtube to do this manicure.
I used China Glaze White on White (2 coats), and then I sponged (my first time ever) with CG Papaya Punch, I did two layers. When it was dry, I used a black striper polish. The top coat is Seche Vite Dry Fast Top Coat.
I enjoyed the result very much, it was fun, a little time consuming to do for a newbie, but totally worth it. I will definitely try it again, also with different colors and some with zebra stripes, I have several ideas.
Sigh, the only problem in using quality nail polish and top coat is that it doesn’t chip or peel, so after a week or so, I force myself to change the color – because there is so little time, and SO many polishes :)
Den 28.09.11 tog jeg mod til mig, og kastede mig ud I “Tiger nails” efter inspiration fra “Cuteploish” på Youtube.
Jeg brugte China Glaze White on White, to lag, og så brugte jeg et lille stykke makeup svamp til at duppe den orange farve, China Glaze Papaya Punch, på, to lag. Da det var tørt brugte jeg en sort striper til at lave tigerens striber, og som top coat brugte jeg Seche Vite.
Jeg var meget tilfreds med resultatet, det var sjovt, ret tidskrævende især for en nybegynder som mig – men værd hvert et minut. Jeg vil helt sikkert gentage dette design, også med andre farvekombinationer og nogle med zebra striber, jeg har mange ideer.
Suk, det eneste problem ved kvalitets neglelak og top coat – det holder så længe uden at skalle, at jeg virkelig er nødt til at tvinge mig til at skifte neglelak efter en uge – for der er så lidt tid og SÅ mange neglelakker :)

Related Posts Plugin for WordPress, Blogger...